Wednesday, September 28, 2011

So I cut it

I'm not extremly proud of myself for the result, but I am proud I stopped staring. I know, I know, it's part of the process. Still....

The good part is that these fabrics look incredible in pictures. And that I finally managed to take nice closeups with my DSLR.


IMG_3657 (Large)


Another great part is that my too boyish boy decided to actually look at something I made and got a nice pic. Yeah, he's got long hair, but he shows no interest what so ever for anything I make. I tried closes, bags, monsters, stuffed creepy stuff... nothing. So a pic with him and a quilt became priceless here.

IMG_3669 (Large)

The not so good part is that I did not figure out how to take nice pics with the whole quilt and  I didn't do anything original. I managed to cut it and it turned out ok but... that's pretty much it.

heilroom-quilt-3

And I couldn't get myself to quilt it zig-zag. It has 100 x 140 cm [~ 40" x 55"] and well... no thank you :).

But I did take out some Ikea angels that is only available in winter, hoping they'll make it this year too. Keep your fingers crossed or I'll be very very sorry for using it :))


Now if only I could find the blue embroidery thread that was used, sometime last week, in making some monters traps...

Sunday, September 25, 2011

Now that's a problem

The lovely Kathy, from Pink Chalk Fabrics, one of my favorite shops ever, featured my Little Prince Quilt in her newsletter and got myself with a 20$ gift certificate. I can't let it wait, can I? And how can I order for 20$? I have to fill a flat rate anvelope, don't you international buyers :D agree?

But, you see, I really need some solids. And I always buy my solids from FabricShack. The half price shipping, huge selection of solids and great price in unbeatable. So I have a full cart waiting there.

At the same time, after a week of exchanging mails, the lovely Monica from Mountain of the Dragon got me a special listing with pretty much every Echino I ever dreamt about. From fat eights to half yards of everything I am madly in love with.

And Hanckos of Paducah has free shipping [you need to be subscribed to their newsletter to find about great deals] and I really really really need some batting.

Of course, I'm making no money here staring at the Heirloom beauty and barely cutting some 1.5 " squares.

Tuesday, September 20, 2011

Now what?

This happens to me all.the.time. I dream about a fabric, or, in this case, the whole line, I wait a lot to get the funding, order, 3 weeks to arrive, 1 week in customs and when I finally have it, I just stare at it. Stare in a good way, of course :D.


I felt in love with Joel Dewberry's Heirloom from the second I saw it, before it was even released. And I knew exactly what I want. And now, all I can do is stare :)


I have about 4 quilts in mind and have no ideea where to start. And, of course, it won't be enough fabric for 4 quilts, so I have to choose. Does this happen to you too? It's killing me!

Saturday, September 17, 2011

How about a tiny wallet tutorial?

Remember my first tiny wallet? He's doing fine, in case you were wondering. Ok, I admit, he [badly] needs a wash. And what better thing to do than wash it? Make another one :D.

my_tiny_wallet-01

I really am kidding here, I am way to cheap when we're talking about Echino. But since I am feeling very crafty these days, I thought I should share :).

I made it tiny because this is how I like it. Of course, if you want it bigger or with more pockets, it's totally doable.

Step 0 - dimensions


I measured the biggest bill I carry and added about 3/4" for the hight. I planned to use binding so I calculated 2 x 1/4" and another 1/4" for safety :)
[Because I am using binding, when sewing it, the risk of catching all the pocket in the binding is really high when they have similar heights. So you have safety 1-keeping the money into the wallet and 2-helping you when attaching the binding].


I measured the width of a credit card, added sewing allowances for the pockets and binding and left about 1/4" in the middle, to have it fold better.


My final dimensions for the large pieces in helicpters were about 9" x 4 1/2", in bicycles 8 1/2" x 4" and for the smaller ones were about 3" x 5" but I cut them later as they were too big.. 

Step 1 - supplies


Choose your fabrics for exterior, interior and binding. It is a too small project to just add binding later, for example. Plan all of them together, accesories too.
I had a leftover from an Echino FQ and worked just perfect. I even spared one helicopter :)) [Yeah, I'm that cheap when it comes to Echino :))))], For inside and binding I used Kona in pepper.

Choose your stiffing :): interface, batting, fleece [for the green one I used fleece, for this one I tried a very heavy interface].

Chose your closure device :): snap, velcro, elastic. I had snaps in both cases because I just like them very much :). If you think velcro I suggest you use the same technique, with strip. If you use elastic you just replace the strip with elastic and the male snap with a button.


Step 2 - cutting


Cut 4 large pieces. I made mine 9 x 4 1/2, plan yours to your needs and jeans pockets :D.
You will use all of them for the largest pocket, where you keep the money.

Cut 4 smaller pieces, for the credit cards. This will give you 2 pockets. If you want more pockets, just add 2 pieces for every new pocket. I made mine about 5 x 3" but they were way too big and I cut them later.

You can cut a strip for the snap now but I suggest you do it later, when you have everything ready and the measurements will be more accurate. I had a perfect leftover and just left it in the pic :).


Step 3 - go

Join 2 of the larger pieces, long sides together. Iron open, fold again and sew a decorative stitch. Or, like me, iron open, sew at 1/16" or 1/32" from the stitch and fold after. It will have a neater look ;). Iron again and put aside this side of the pocket.


Quilt or use interface for the external layer. If, like me, you're using snaps, simply pin the two larger pieces left, wrong faces together [just like the finished product] and place the snap. Unlike me, please put the male snap, not the female one. Or put it wrong and do it again after :))) If I am confusing you right now, please take a look at the last pic to see how it should look.


Sew the tiny credit card pockets. Wrong sides facing out, only sew two adjacent sides. The other two will be caught under binding, don't bother yourselves with them :)
.

Keep in mind you will have one for the left side and one for the right side, so you want them mirrored. Turn and iron petty well.

Step 4 - putting them togheter

Take the inner side of the big pocket [the one you put aside] and sew the 2 small pockets on. Make a test with your card, just to be sure. Leave at least 1/4" between the small pockets if you want a nicely foldable wallet.

Take the pieces with the snap and make a sewing line in the middle. This will help your pocket fold in half even better.
[I am sooo sorry, I completely forgot to take a pic for this step, but you can see it with binding on]

Now go make the sandwich. You can make a 1/8" perimetral stitch, just to keep things in place while you attach the binding. And do use your walking foot!

Step 5 - binding
I have tried many many many ways of attaching the binding. What I like best, for a tiny wallet, is a 2 1/4" folded binding, sewn on the back of the wallet. You have a lot of control of what happens on the front of the wallet and it's nice and small. I would have tried a 2" one but the interface was so heavy I got scared. Next time I'll definitely try the 2".


After attaching the binding on the back it's a good time to make the strip for the female part of the snap. Make it as wide as you like [mine is about 1/2 - 3/4"], and measure the length you need [the position of the other side of the snap and the thickness of your wallet make this length vary. So please go measure :).Remember to add 1/2", 1/4" for the binding and 1/4" sewing allowance for the end]


Although it may seem too little to care about this, do clip the corners. It will look much much better.

Step 6 - finish line

Finish sewing the binding on the face of the closed wallet and remember to stitch the strip too.


The last thing to do is attach the snap to the strip, just to be sure you measured everything right and the wallet does close :). 


There you go :). See how nicely it folds?


Now please let me know if you have any questions or if I'm spelling things wrong here :))) And, of course, feel free to make as many wallets as you'd like, just do think about me and make me feel good by telling me what great things you made following my tutorial :)))

Thursday, September 15, 2011

How to find the dimensions of the perfect pouch

Thanks to Sonia, I realised my tutorial was missing the scale. So, if you want to make your box pouch, here are some thoughts about the dimensions.


[click the pic to see it larger]

If you know what size you want your box to be, L[length], W[width], H[heigth], use the formulas below to find the size of your pieces and corners.


If you're making a small box, or you're a quilter, you can use 1/4" sewing allowance. If you're using a fabric that frays a lot or you want a bigger or stronger box, you might want a 1/2" sewing allowance. I am used to work with cm and only use 1/4" when quilting, so I usually have 1 cm sewing allawance :) It's not that important, as long as you keep it constant. For garments, however, 1/4" is usually a little to little :) 


If  you have 1/4" sewing allowance and 1/2" where you attach the zipper.
a = L + H +1/2"
b = H + W + 3/4"
c = H * 0.7 [I have no ideea how one can choose to work in base 8 :) and I barely remember how to multiply in base 8, if so ]

If you're using 1/2" allowance and 1" for the zipper, you'll have:

a = L + H +1"
b = H + W + 1 1/2"
c = H * 0.7


And, of course, if you're lucky like me and live life in metric ...

a = L + H + 2 cm
b = H + W + 3cm
c = H * 0.7


Please let me know if you have any questions. And enjoy your pretty pouches :) Oh, and if you have no ideea what I'm talking about, you might want to have a look at the tutorial here.

How to work in the same room with the kid

I may not be living close to Ikea anymore, but I surely learned all their products by heart.


So, we got ourselves a Svava. And since we cosleep and the kid doesn't actually have his room, what better place to stumble on a huge kid moving something but my work room?

IMG_3435 (Large)

The kid is, however, happy. Of course, not after I found the trick with the chair, keeping the whole shabang out of my way. He does take it out in a second and I'm dizzy everytime I look at him, but look what a great background for a picture :)

IMG_3432 (Large)

Thursday, September 8, 2011

Oh, yeah! My perfect box pouch and a tutorial

I have to be honest. I only made 3 more boxes until it hit me. Just so you don't think I'm crazy making a douzen more :).
Long story short, batting and fusible turned out to be not that important. The trick was somewhere else. So, with these 10 boxes behind me, let me tell you how I made my perfect tiny cute useless thing. That will surely get some use someday ;).

UPDATE: Step -1 :))) You might want to check for the dimensions before starting.

Step 0 - You can skip to step 6, if you made pouch boxes before. Have a lemonade while the others still struggle with steps 1 to 6.

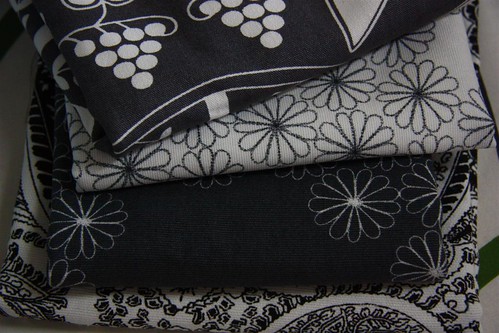
Step 1 - fabrics and accesories. 
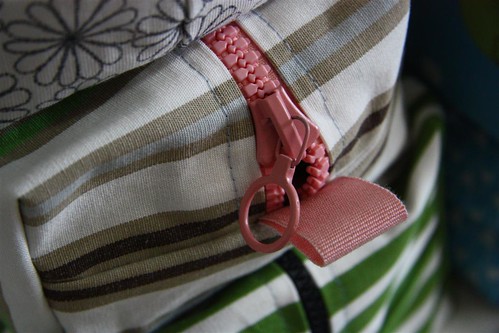
Prepare your fabrics, turn on your iron, get the mat and the cutter cleaned. Take one zipper that does not fully open and some ribbon.


I got the best results with one layer of heavier fabric - the outer one- and one of quilting cotton - the inner one. The quilting cotton doesn't require fusible. I wanted to use it for this old Kaufman strips, much thinner that kona, for example, but didn't use it in the end and it turned out fine.
 If you want to use quilting cotton for the outside, the box will look better [empty] if you put either some fusible web or quilted batting. Not the both of them, though, as it becomes too difficult to work with.
Also, two heavier fabrics are a little to much, but doable.

Step 2 - cutting.
Cut the width of the pouch after the lenght of your zipper. [Do not use longer trimmed zippers if you want it perfect. And you do, right? ] Whatever leght makes you happy, I made them almost square. [after 9 of them you realise it really doesn't matter that much :D]


If you are using an animal print or you are a beginer, cut 4 equal pieces, 2 for the outside and two for the inside. Again, after 9 boxes I had no mood to cut the exterior fabric in 2 pieces, I just left it in 1. One less step for me :D.
If you cut only 3 pieces, the inner pieces have to be 1/2 inch longer than the half of the outer one. Also, if you have a directional print, one side of your box will have the print upside down.

Step 3 - attaching the zipper.
I saw many ways of attaching the zipper. I like this one best because the zipper won't get stucked with inner fabric and is very very easy for this kind of project, with relativly small zippers.

Iron [very well!] down about 1/2" along the fabrics edges, where the zipper is supposed to stay.


Make a sandwich with inner fabric wrong side up, zipper, outer fabric right side up.


If you're an advanced sewer, simply arrange the sandwich with your hands while you're already at the sewing machine. If you're kind of new to sewing, you're allowed to pin a little :), just to see how exactly the fabrics are supposed to stay. Take off the pins when you started sewing and arrange the fabrics as you go.


I like to see the zipper, so I'm not trying to cover it, but you can if you like it better. But don't put the inner fabric closer to the center of the zipper, or it will block the zipper the exact moment when you actually need something from the box!
If you want a neat look, set your sewing machine to a larger step. 3 is my favorite.

Start with the zipper opened and half way along its lenght stop the machine with needle in, lift the presser foot, turn your fabric 90 degrees, keep the end of the zipper in place with one hand and close the zipper with the other. Turn, lower pressing foot, continue sewing the zipper.


If you chose to cut your outer fabric in two, repeat this step with the second part of your zipper. If you chose one piece of outer fabric, you will see this when sewing the second half. It looks bad but it isn't. You're an advanced sewer and the zipper is short ;). Please make it look like this so you won't accidently sew multiple layers.
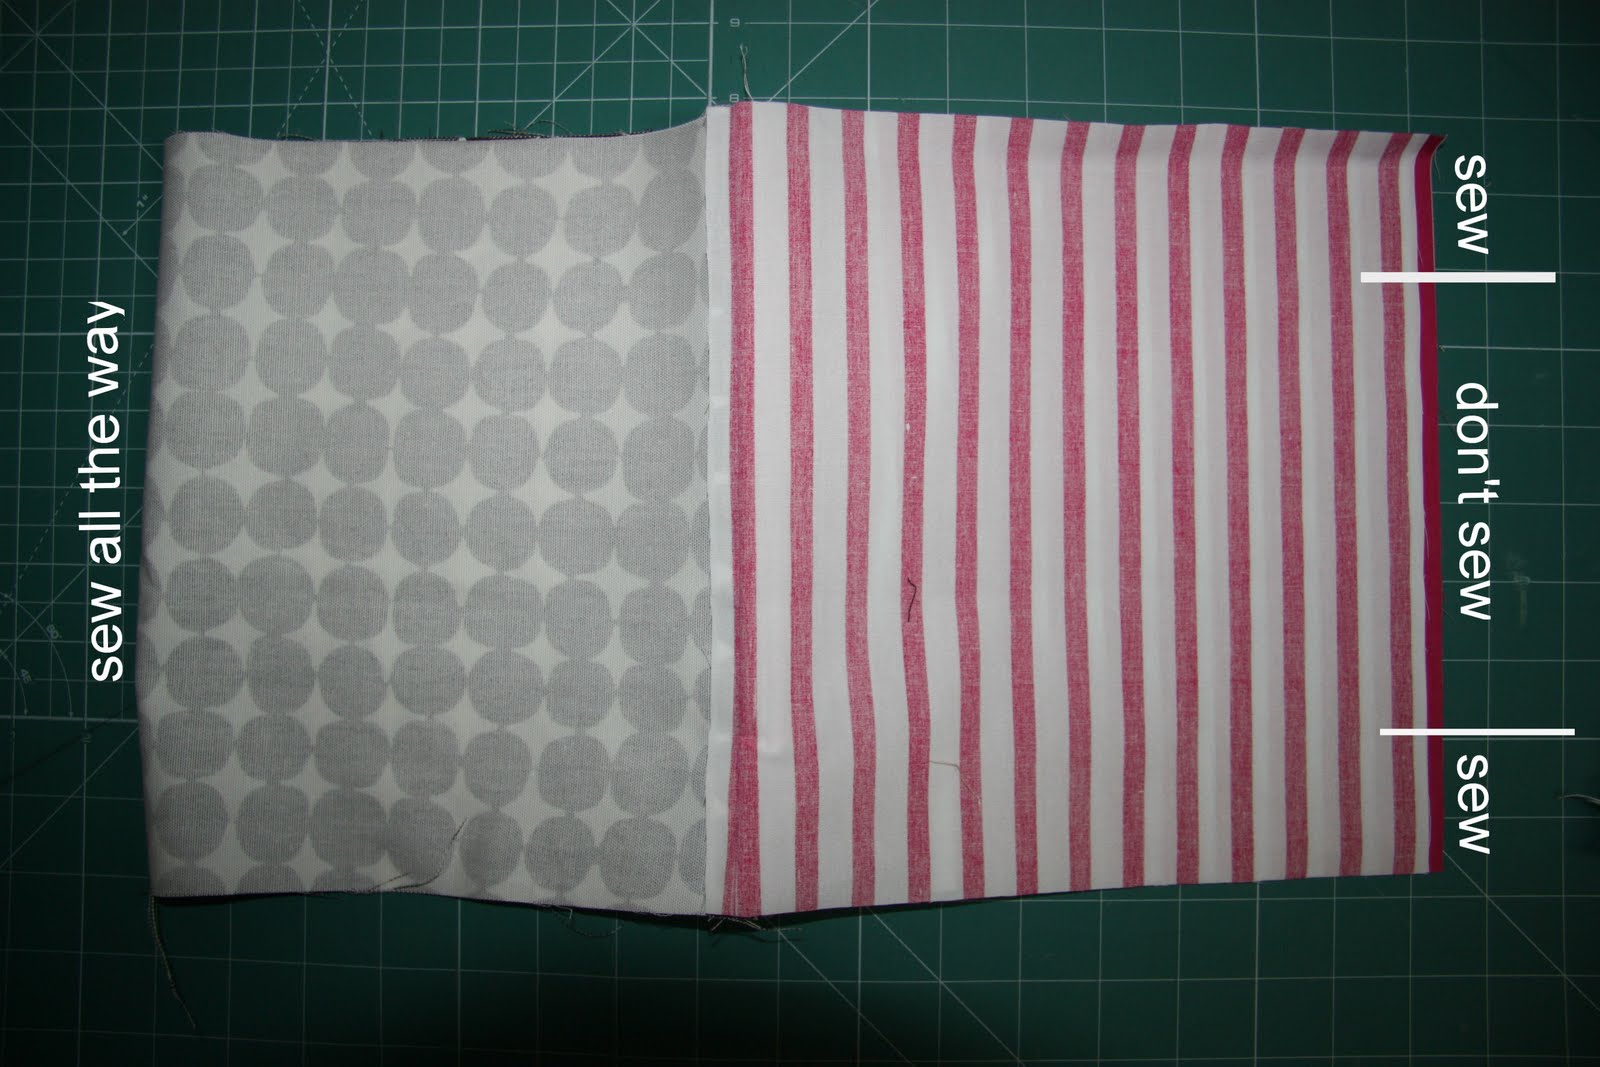


Step 5 - closing.
Change to regular stitch lenght!
If you made 2 pieces of outer fabric, simply close it now on one side, as pictured. For the inner fabric, sew 2-3" from the edge to the middle, secure stitch in the end and leave a hole for turning. [ I like a bigger hole, I only sew 2"]


Iron them and press to one side.
Leave the upper and lower sides not sewn.
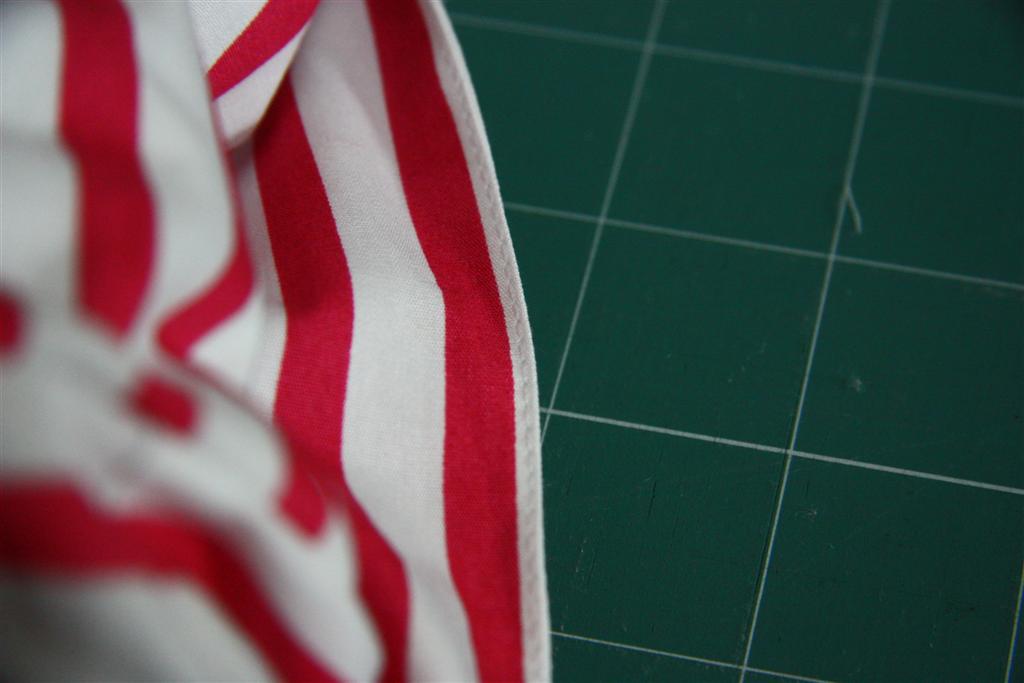
the trick


Step 6  - Sandwich
Prepare your ribbon. Cut two pieces, fold them in half to see how long you want them. I like them because it's always a pain to open the zipper [when you need it most] without them and they are actually helpfull at this point.


Sandwich the whole shabang alining to the center:
  • middle of the inner fabric
  • middle of the zipper
  • folded ribbon
  • middle of the inner fabric

Start with the ned of the zipper, it's easier.
You can pin. I couldn't, I pinned a little to much these days :D. 
Starting half inch away from the ribbon, sew through the ribbon and one inch more. Leave the edges open. [ ignore the white thread, I decided to go with green this seazon :D]


Open the sandwich and now sew only inner fabric, as close as possible from the previous stich. It's ok if you have1/4" gap, we will cover it later. 
Do the same for the outer fabric, you'll be doing this 8 times, 4 for the inner fabric, 4 for the outer.


Now sew again all layers, But only in the middle, and make sure you close the gaps.[dark green stitch only]


The pouch will look like this:

Flatten it and gently press the corners with your iron. You want to have a small ironing sign on the corners.
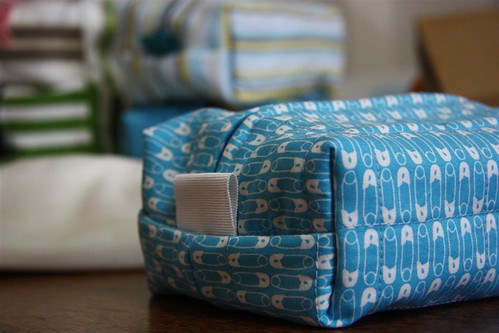
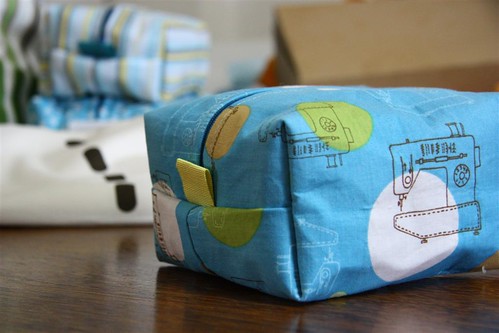
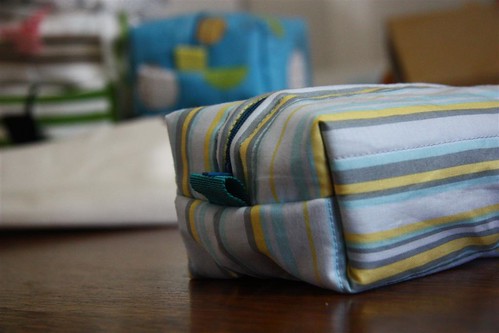
Step 7 - Corners
Put hour hand inside the pouch and unfold the corners. 


Using the ironed line as a guide to center the triangle, with a triangular ruler draw and pin the corners.


Make this step for every corner, 8 times total. You should have a little hedgehog now, so be carefull with your fingers when sewing.


Cut the extra and keep them for 8 dwarfs hats or something :)


Step 9 - turn, sew and enjoy

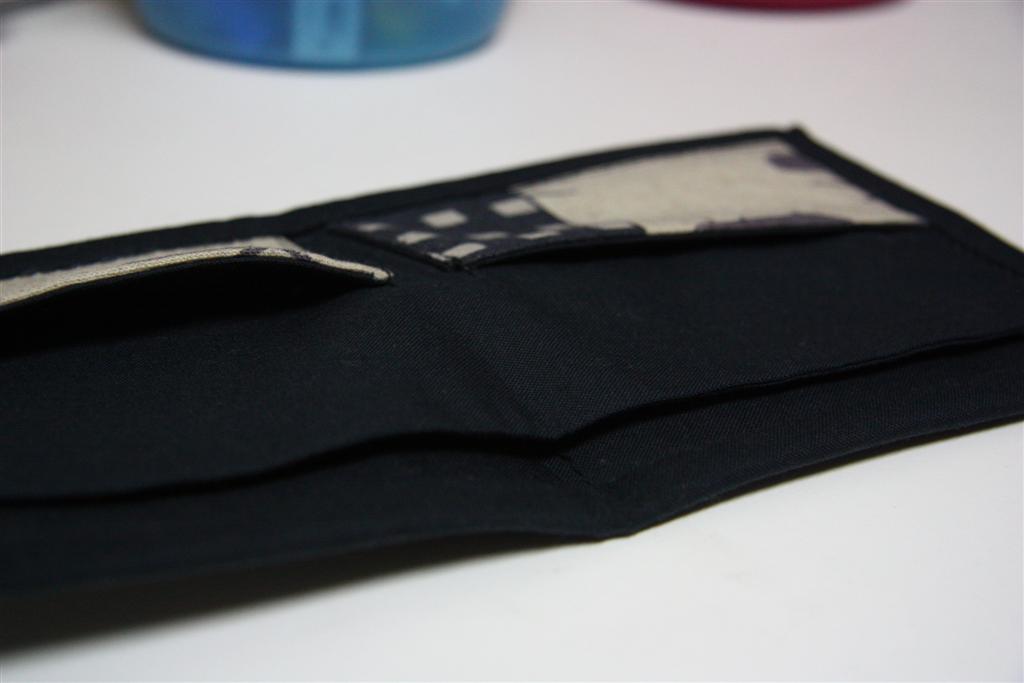
Through the hole you left open at step 5, turn the pouch. You will now have the inner fabric on the outside. Take a look at your amazing zipper [if you have a zipper with two faces, you just got yourself a fully reversible box pouch] and nicely arrange the corners
.


You can handsew the hole or machine sew it with matching thread.


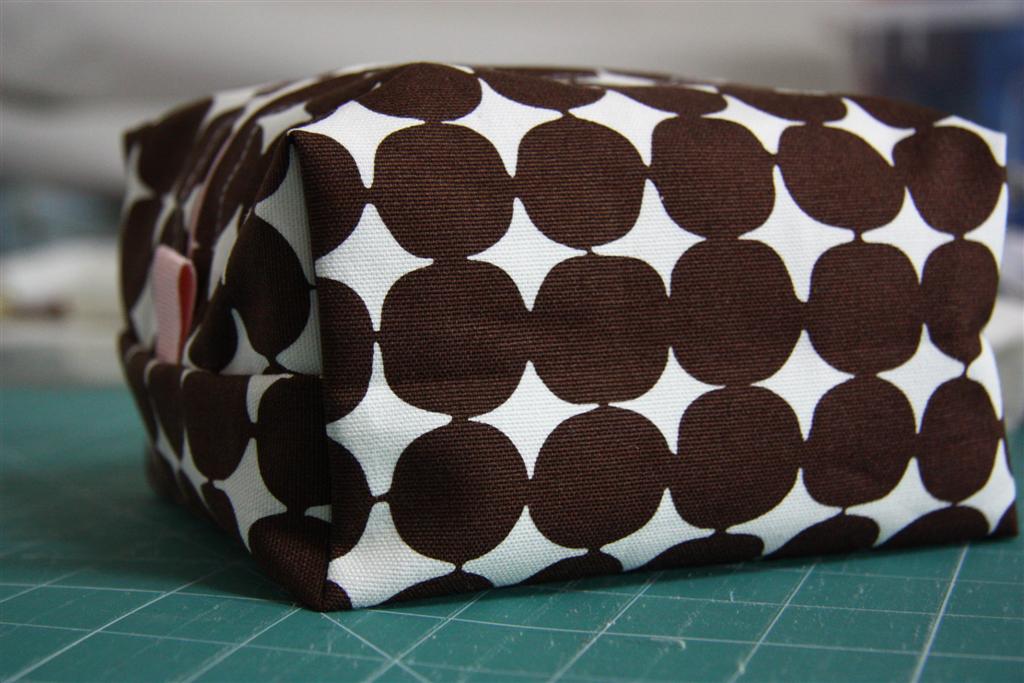
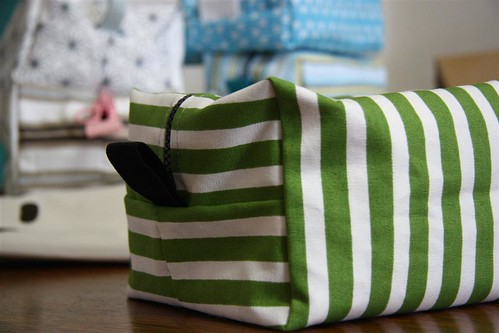
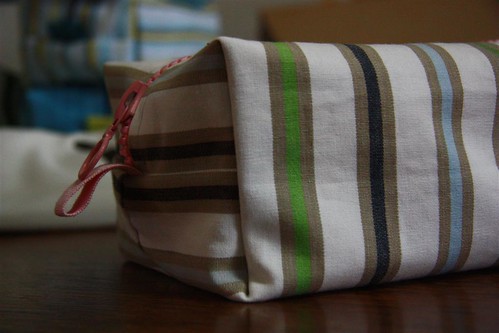
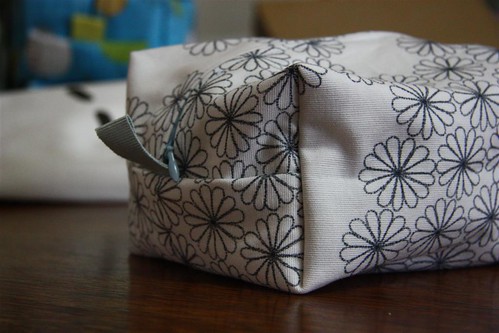
Turn it on the right side and just admire your perfect pouch! Or put it on the pile and just breath. It was a long day for some of us :)


 I you have any questions, please ask, I will answer them with a comment at this post.
Feel free to do whatever you like with this tutorial :), I would love if you'd link back to see what you've done with it.

Monday, September 5, 2011

The quest for the perfect box pouch

[if the term box pouch is not the best, please tell me how to change it]

IMG_3269 (Large)

I am crazy in love with this little things. In my humble oppinion they are basicly useless :), but I still love them. I had no mood for sewing [probably because I have quite a list for custom quilts waiting], so I needed some instant gratification. What better way, I say, but these little cuties?

The best tutorial I found is here. The pictures are very easy to follow and you're done in a couple of minutes. However, I needed the perfect one. So I started trying.

IMG_3290 (Large)
With some stiff Ikea home decor on the outside, and quilting cotton on the inside. The box is quite big so it was no surprise that it didn't keep it's shape empty. So I tried again.


IMG_3289 (Large)
Smaller box, soft home decor on the outside, stiff home decor on the inside. Not better at all, I think is evern softer than the first one and definitey less stiff. So I tried again :).


IMG_3284 (Large)
Slightly smaller box, soft home decor with some light fusible on the outside, stiff home decor on the inside. Better, still not perfect.
Looking at all three I realised that I don't like the look the zipper has after is beeing cut. The larger the zipper teeth, the worst.

IMG_3271 (Large)
The one with hidden zipper looked the best. So the next ones are made to fit the zippers I had.


IMG_3288 (Large)
Next one is made with quilting cotton and poly batting on the outside and stiff home decor on the inside. It keeps its shape very well but has this look that I don't necessarly like, like the free motion quilting. So, of course, I tried again.


IMG_3287 (Large)

I found some very heavy fusible web and gave it a shot. It really keeps the box in shape, but because I had to turn it through a really small hole [small zipper => small pouch], it lost the aderence and doesn't look so perfect anymore after it's completly done. Plus, they are impossible to iron, way to small for this. Plus, the heay fusible got me with unusable pins and needle for the sewing machine, it worked very very very hard on my machine, there are points where my machine [brother 400] simply couldn't sew. Guess what i did? I tried again, of course :))


IMG_3285 (Large)
The last one for the day, quilting cotton, light fusible and fleece on the outside, soft home decor on the inside. This was one of the worst ideeas, since the fusible web didn't stay on the fleece and kept shifting, you can see the corners are far far away from beeing perfect.


So? What next, you ask? I lived for 2 years ten minutes away from Ikea. I have a stash and I'm not afraid to use it :)))
IMG_3276 (Large)


I will also try making two different bags, one for the inside and one for the outside [not like the turioal I just linked to], I also changed the way the zipper is attached, and I will let you know when I'll find the best combination.